There is a specific sound that strikes fear into the heart of any homeowner. You’re brushing your teeth, humming a tune, when suddenly the water swirling around the drain begins to rise instead of fall. You pause, staring at the porcelain basin, hoping it’s just a temporary delay. But no. The water sits there, stagnant, refusing to budge.
It’s official: you have a clogged drain.
Before you reach for a bottle of toxic chemicals or frantically dial the nearest emergency plumber (and your credit card), take a deep breath. A clogged drain, while annoying, is usually a manageable problem. In fact, most clogs can be resolved with a little patience, the right tools, and a systematic approach. This step-by-step guide will walk you through exactly what to do when the water stops flowing, ensuring you handle the situation like a pro.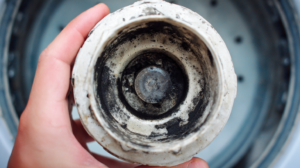
Step 1: Do Not Make It Worse
The first rule of plumbing is the most critical: stop using the water.
It sounds obvious, but panic often leads to instinctive actions that compound the problem. If the water is rising in the sink, do not run the faucet again to see if it has “fixed itself.” If it’s a toilet, do not flush again. Every additional gallon of water you introduce to a blocked pipe adds hydrostatic pressure to the clog. If the blockage is stubborn, that pressure has nowhere to go but back up—or worse, it can stress the pipe joints, potentially causing a leak behind your walls.
Take a moment to assess the situation. Is the clog isolated to one fixture (like a single bathroom sink) or are multiple fixtures backing up (e.g., the shower, toilet, and sink)? If multiple drains are affected, the issue is likely in the main sewer line, which is typically a job for a professional. If it’s just one sink or tub, you are likely dealing with a localized clog—and you’ve got this.
Step 2: The Gentle Approach (Boiling Water)
Before you dismantle your plumbing, start with the gentlest, most readily available solvent: water.
If you have a metal drain pipe (such as in a kitchen or bathroom sink) and you are certain the clog is caused by grease, soap scum, or organic material, boil a large pot of water. Pour the boiling water directly down the drain in two to three stages, allowing the hot water to work for 10–15 seconds between pours.
A word of caution: Do not use this method if you have PVC pipes that are not rated for high heat, or if you have recently poured chemical drain cleaners down the drain. Hot water can soften PVC joints and cause chemical reactions to become volatile.
Boiling water works surprisingly well for dissolving congealed grease in the kitchen or breaking down the waxy buildup from soap and body oils in the bathroom. If this solves the issue, congratulations—you’ve fixed a clogged drain in under five minutes with zero mess.
Step 3: The Plunger—Your Best Friend
If the boiling water didn’t work, it’s time to bring out the heavy artillery: the plunger. However, there is a right way and a wrong way to use this tool.
Most homeowners own a standard cup plunger (the one with a flat rubber cup), but for sinks and tubs, a flange plunger (which has an extra rubber flap extending from the cup) is superior. If you only have a cup plunger, it will still work, but you need to create a seal.
How to plunge effectively:
-
If you are working on a double-basin kitchen sink, seal the second drain with a wet rag or the sink stopper. If you don’t, the air pressure you generate will simply push air out of the other drain instead of forcing the clog.
-
Fill the clogged basin with enough water to cover the rubber cup of the plunger. The water acts as a hydraulic seal.
-
Place the plunger directly over the drain, ensuring a tight seal.
-
Use vigorous, consistent plunging motions. Do not pull the plunger off the drain; keep the seal intact. Push down firmly, then pull up sharply. The suction on the up-stroke is often what dislodges the clog.
-
Do this for 15 to 20 seconds, then pull the plunger off quickly. If the water drains, run hot water for a minute to flush out any remaining debris.
Step 4: The Plumbing Snake (Auger)
If the plunger fails, you are dealing with a clog that is deeper in the pipe—likely a solid mass of hair, soap scum, or a foreign object. This is where a plumbing snake (or auger) becomes invaluable.
You can purchase a basic handheld drum auger for under $20 at any hardware store. This tool is a long, flexible metal coil that you feed into the drain to physically break up or retrieve the blockage.
How to use a snake:
-
Remove the pop-up stopper or drain cover from the sink or tub. In a sink, this usually involves unscrewing the rod located under the cabinet behind the drainpipe.
-
Insert the cable of the snake into the drain opening. Begin cranking the handle as you feed the cable in.
-
You will feel resistance when you hit the clog. Do not force the cable aggressively, as you could puncture the pipe. Instead, crank the handle to allow the tip of the snake to bore into the blockage.
-
Once you feel the cable push through the clog, crank it back and forth a few times to ensure the debris is broken up, then slowly retract the cable. Often, the snake will pull a disgusting clump of hair and gunk back with it—which is exactly what you want.
-
Once the snake is removed, run hot water to test the drain.
For shower drains, a simple zip-it or hair snake (a plastic stick with barbs) is often sufficient to pull out hair clogs that are just below the surface.
Step 5: The P-Trap Gambit
Sometimes, the clog isn’t in the wall; it’s right under your sink. The curved pipe beneath your sink, known as the P-trap, is designed to hold water to prevent sewer gases from entering your home, but it’s also a magnet for heavy debris, jewelry, and small utensils.
If the snake didn’t work, or if you suspect the clog is very localized, disassembling the P-trap is a highly effective solution. Place a bucket underneath the trap before you begin.
Most P-traps are made of PVC and are held together by slip nuts that you can loosen by hand or with channel-lock pliers. Unscrew the nuts on either end of the trap and remove the curved piece. You will likely find the culprit—a sludgy mass of toothpaste, food scraps, and congealed grease. Clean it out thoroughly in a trash can (not your newly unclogged sink), reassemble the connections, and run water to check for leaks.
Step 6: When to Use (and Not Use) Chemical Cleaners
By this point in our step-by-step guide to a clogged drain, you may be wondering about the bright bottles of liquid plumber under the cabinet. While chemical drain cleaners can work, they come with significant risks that often outweigh the benefits.
The Case Against Chemicals:
-
Pipe Damage: Chemical cleaners generate intense heat to dissolve organic matter. In older homes with metal pipes, this heat can corrode pipes over time, leading to pinhole leaks. In PVC, the heat can soften the pipe, causing warping.
-
Safety: These chemicals are caustic. If they splash back on you during plunging, they can cause chemical burns. They also produce toxic fumes.
-
Plumber’s Headaches: If you use a chemical cleaner and it doesn’t work, the plumber you eventually call has to dismantle pipes filled with toxic liquid, which is dangerous and often increases the service cost.
If you are determined to use a chemical solution, opt for an enzyme-based drain cleaner. These use bacteria and enzymes to digest organic matter (like hair and grease) over several hours. They are safe for pipes, environmentally friendly, and far less hazardous than their caustic counterparts.
Step 7: Prevention Is Easier Than Cure
Now that you’ve successfully conquered the clog, it’s time to ensure you don’t have to repeat this process next week. The best way to handle a clogged drain is to prevent it from forming in the first place.
-
Kitchen Sinks: Never pour grease or oil down the drain. Even if you run hot water with it, the grease will congeal as it cools further down the pipe. Scrape all food scraps into the trash or compost. Use mesh strainers in the drain to catch small particles.
-
Bathroom Sinks and Showers: Hair is the primary culprit. Install drain catches or tub shrooms to intercept hair before it enters the plumbing. Regularly remove and clean these catches.
-
Flushing: Stick to the three P’s: Pee, Poo, and (toilet) Paper. “Flushable” wipes are a misnomer; they do not break down like toilet paper and are a leading cause of sewer backups.
-
Regular Maintenance: Once a month, pour a kettle of boiling water down drains that see heavy use. A mixture of baking soda and vinegar followed by hot water can help keep organic buildup at bay.
Step 8: Knowing When to Call a Professional
There is no shame in calling a plumber. In fact, knowing your limits is a sign of a savvy homeowner. If you have gone through the steps above—plunging, snaking, and cleaning the P-trap—and the water still isn’t draining, it’s time to bring in the pros.
You should also call a professional immediately if:
-
Multiple drains are clogged. This indicates a main line blockage.
-
Water backs up in unusual places. For example, if flushing the toilet causes water to come up through the shower drain.
-
You hear gurgling sounds. This can indicate a blockage in the vent stack or main line.
-
You suspect the clog is in the main sewer line. Professionals have specialized equipment like motorized augers (snakes that go 50–100 feet) and video camera inspection tools to diagnose and fix the issue without digging up your yard.
Conclusion
A clogged drain is undoubtedly an inconvenience, but it rarely qualifies as an emergency. By following this systematic guide—starting with boiling water, moving to the plunger, escalating to the snake, and finally checking the P-trap—you can resolve the vast majority of clogs yourself.
The key is patience. Don’t panic, and don’t reach for harsh chemicals as a first resort. With the right tools and a methodical approach, you can restore the flow to your home, save a significant amount of money, and earn the quiet satisfaction of a job well done.